Bulk Surveys Guide
Last updated: October 9, 2026
This article will teach you about the Bulk distribution method.
Only want to distribute to a handful of courses? Check out our 📄 Individual Distributions Guide.
Introduction
The Bulk Surveys feature allows you to distribute a survey into multiple assignments in multiple courses at once — this could be 10 courses, 100 courses, 1,000 courses, or more!
Using our Bulk Survey Wizard, you can comfortably do in minutes what would take days to do using Canvas's Create assignment flow.
Use Cases
This feature is useful if:
You want to distribute a course evaluation survey into a significant number of courses.
You want to distribute a survey into multiple courses, each with a different start and end date.
You want to distribute a survey using varying embedded data values — such as for multiple instructor names per course.
You want to distribute a survey into a Canvas module in multiple courses.
Prerequisites
Before you can use the Bulk Survey Wizard, the following needs to be true:
Bulk surveys are included in your Qualtrics LTI License type.
Your Canvas root account admin has enabled this feature.
The setting is found in <Institute level> → Settings → Enable the creation of bulk survey assignments.
Note: If using bulk surveys on the Department level of the LTI, this sub-account must also be enabled by your root account admin.
You have created a Survey configuration for your chosen survey with the Distribution method: Bulk. See 📄 Surveys Guide for more information on distribution methods.
You have the correct role type and permissions to be able to use bulk surveys either on the Department level or Institute level of the LTI. See 📄 Qualtrics LTI Levels: Institute, Department, Personal Surveys for more information.
Bulk Survey Wizard
This section will describe how each step of the Bulk Survey Wizard works in detail.
Overview
You can use the bulk survey wizard to distribute a survey to one or more assignments within one or more courses in Canvas.
At its most basic level, you will use the wizard to choose a Survey configuration, followed by the Courses you wish to distribute to, the Assignment details (name, due date, etc.) of the eventual assignments, and optionally any Announcements & Reminders ("Notifications").
More advanced options allow you to:
Provide values for 'Custom text' embedded data fields per assignment.
Choose separate publish, due, and available from/until dates per assignment.
Choose separate dates for Announcements & Reminders per assignment.
Place the eventual assignments into a Canvas module.
... and more!
The rest of this section will detail how each setting works.
To use the Bulk Survey Wizard, head to either the Institute or Department level of the LTI, where you have already added your Survey configuration with the Distribution type: Bulk. Go to the Bulk surveys tab and click + Add bulk survey.
Step: Configuration
The Configuration step contains the most settings and is used to inform the rest of bulk wizard's steps about what you would like to do.
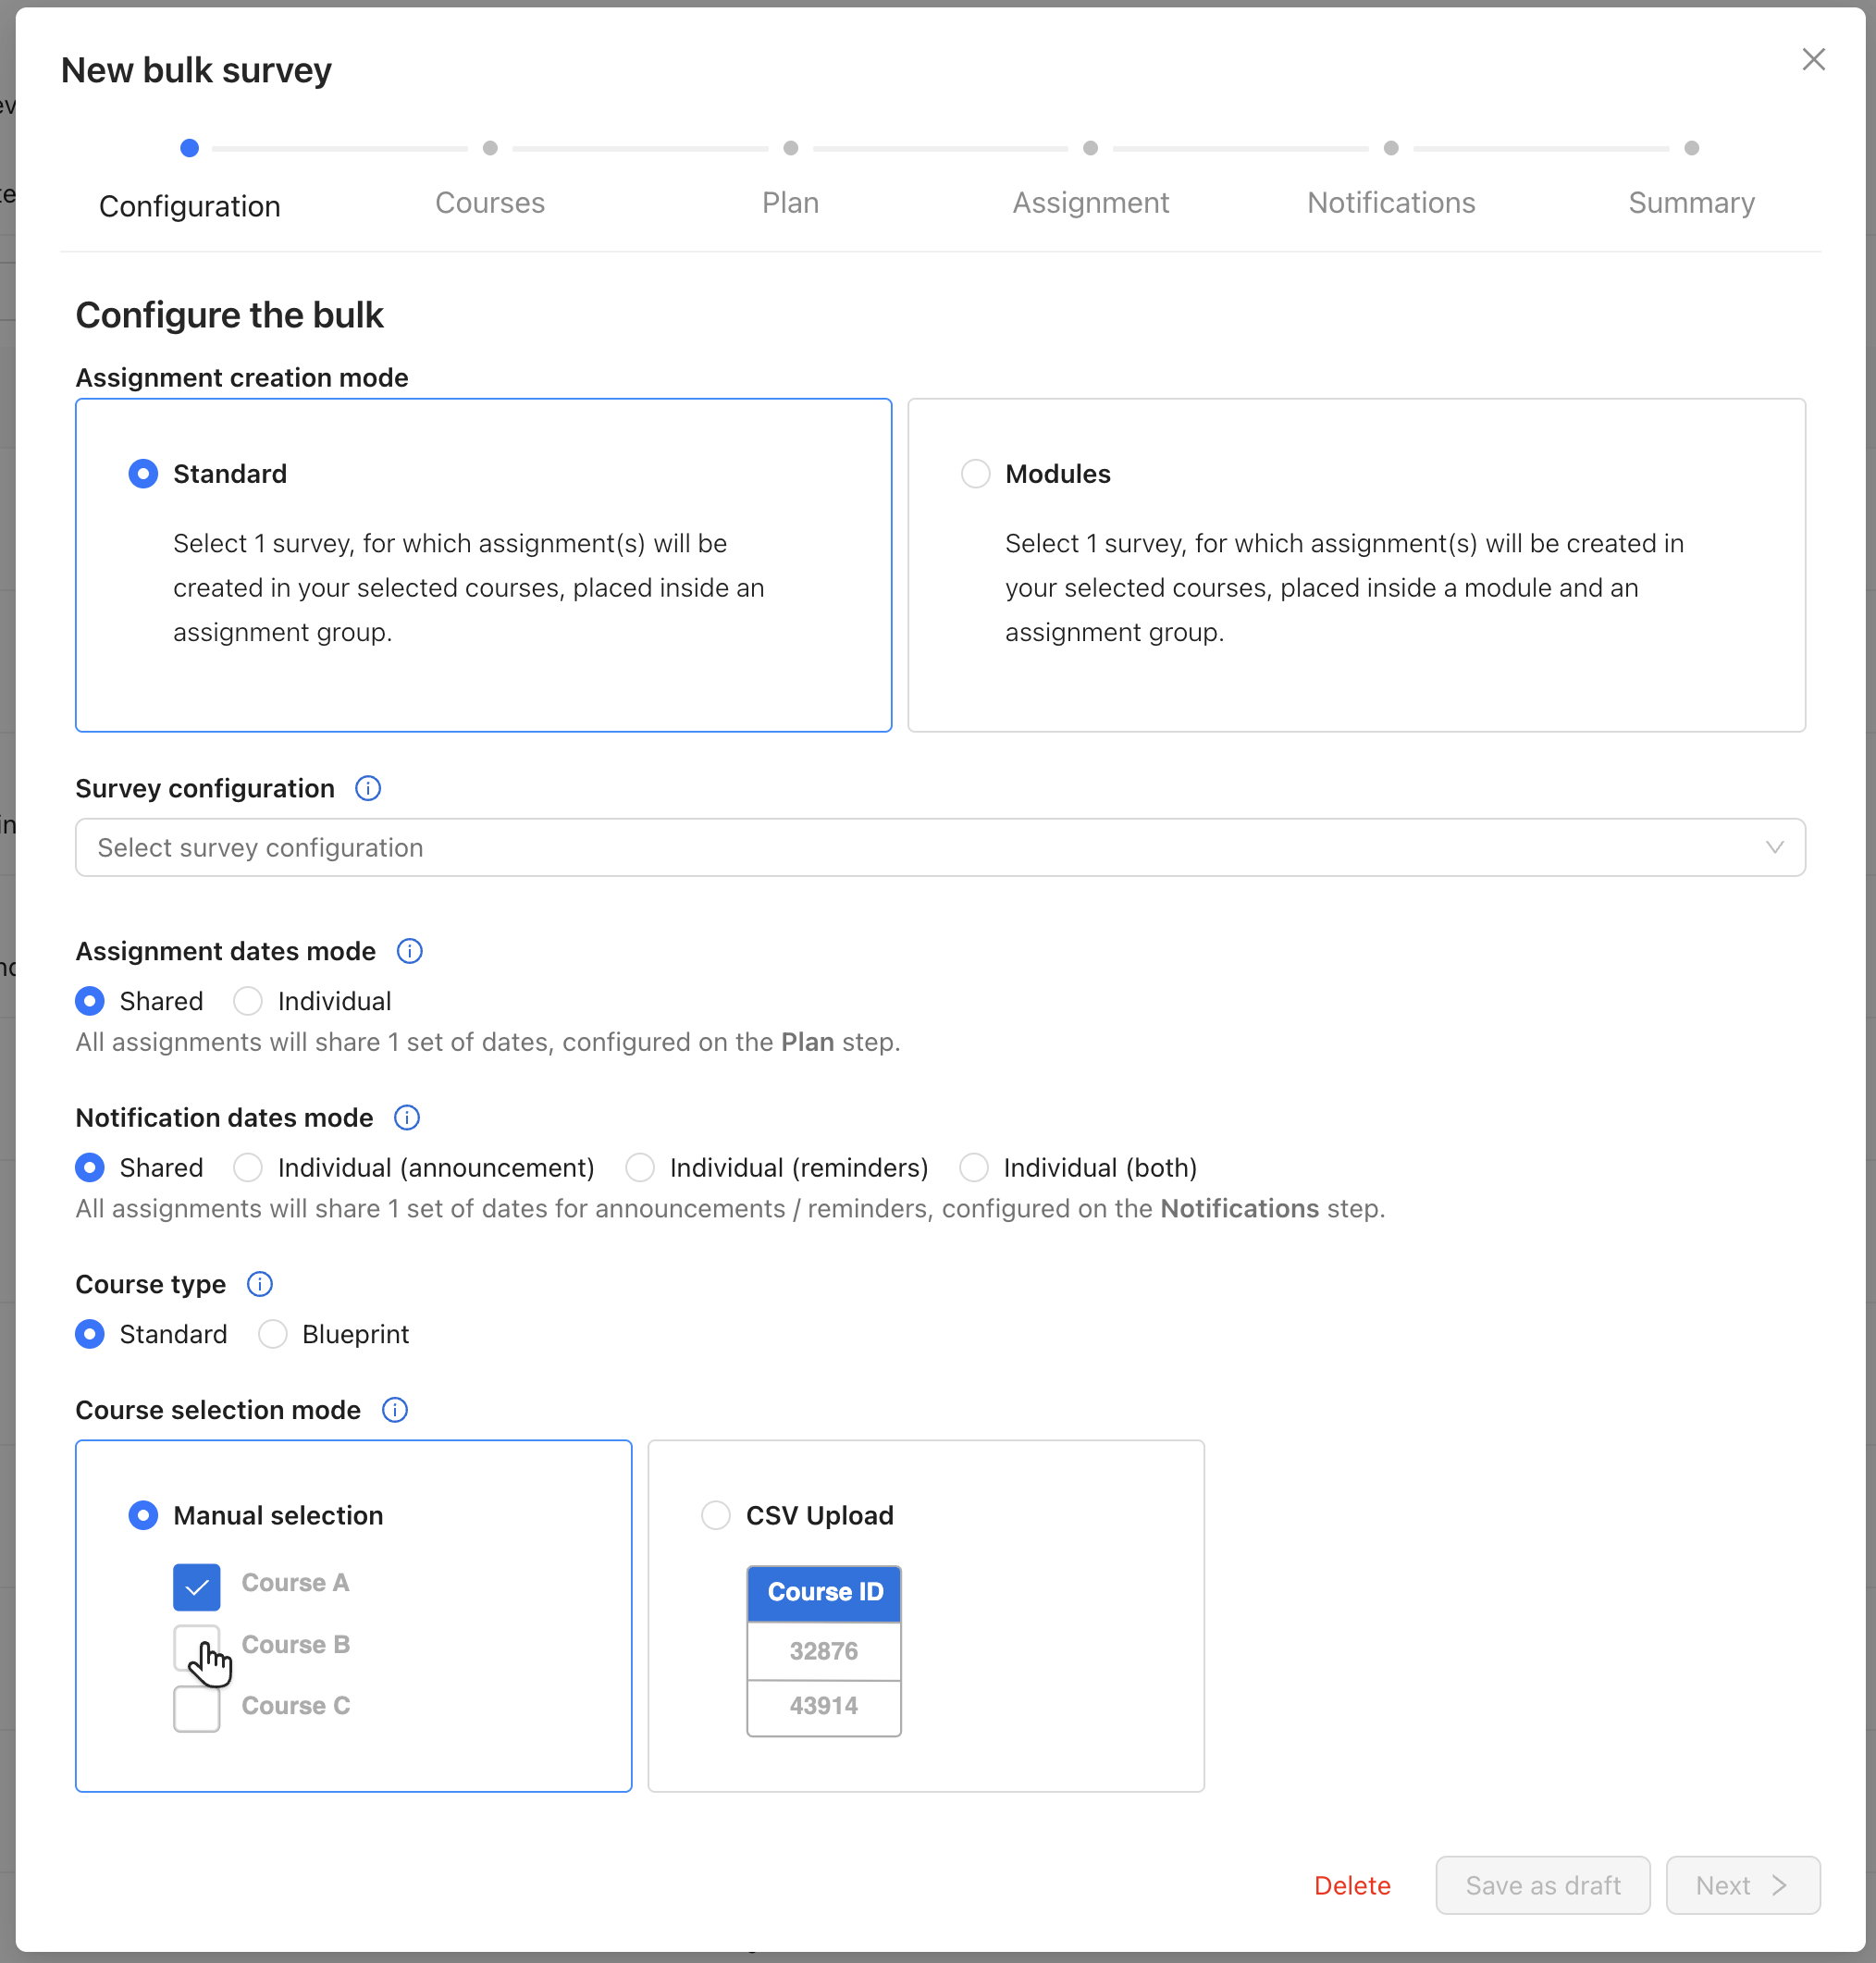
Assignment creation mode
Standard
Modules
Note: We will make a new Module for each bulk distribution: if such a Module has already been created via previous distributions, we will not re-use it.
Note: It is currently not possible to select an existing Module to distribute the assignments into, however we are interested in prioritising such a feature.
If you would be interested in this, please let us know at support@drieam.com!
Assignment dates mode
While creating your bulk, you will choose the following dates for your assignments:
Creation date
Publish date (optional)
Due date (optional)
Available from/until dates (optional)
How you provide these dates is determined by this setting.
Shared
You provide these dates on the Plan step of the bulk wizard. The same dates will apply to all created assignments in each course.
If Assignment creation mode: Modules is selected, then the Creation and Publish dates will also apply to the Module.
Individual
Only the Creation date can be chosen in the Plan step. All other dates are provided in a CSV file with a date format of your choosing, such that each assignment can be given a different set of dates.
If Assignment creation mode: Modules is selected, then an additional column is provided to choose the Publish date of the Module. You only need to set this once per course (as all assignments of the same course are grouped into the same Module).
Tip: For a more in-depth explanation of this use case, please see our Individual assignment dates article.
Notification dates mode
On the Notifications step, you may choose the following:
0 or 1 Announcement date, with a Subject and Body for the announcement
Between 0 to 5 Reminder date(s), with a shared Subject and Body for the reminder messages
In the Body of both types of notifications, you can insert a link to the created assignment.
Shared
You will choose a single date for the Announcement and up to 5 Reminder dates on the Notifications step.
Individual (announcement)
You will provide the Announcement date via a CSV file on the Upload CSV file step, such that each assignment is given a different date.
You will choose a single set of dates for Reminders on the Notifications step, which will apply to all created assignments. For example, if you provide a set of 3 dates, then 3 Reminders will be sent out for each assignment at the same date and time.
Individual (reminders)
You will choose a single date for Announcements on the Notifications step, which will apply to all created assignments. For example, 1 Announcement will be created for each assignment at the same date and time.
You will provide up to 5 Reminder dates via a CSV file on the Upload CSV file step, such that each assignment is given a different set of dates.
Individual (both)
You will provide the Announcement date via a CSV file on the Upload CSV file step, such that each assignment is given a different date.
You will provide up to 5 Reminder dates via a CSV file on the Upload CSV file step, such that each assignment is given a different set of dates.
Course type
This setting lets us know which type of course you wish to distribute to, which affects the options shown in the Courses screen and how we validate your CSV file on the Upload CSV file step.
Course selection mode
Manual selection
The Courses step will appear, allowing you to manually select the Canvas courses that you wish to distribute surveys into. If your CSV file contains courses that you did not select, we will warn you in advance.
CSV upload
The Courses step will not appear. Instead, your CSV file will be the source of truth for which courses the assignments will be distributed into (either by LMS ID or SIS ID).
Number of assignments per course
This option only affects how we process the CSV file, and thus appears only while the Upload CSV file step is active.
Single
Each course will have only 1 assignment.
If we find duplicate courses in your CSV file, then an assignment will only be created for the first instance of that course in the CSV file and duplicates will be skipped.
Multiple
Each course may have more than 1 assignment.
We will not skip duplicates: every row in your CSV file will result in an assignment in the corresponding course.
Tip: This is a useful feature for course or instructor evaluation surveys where there are multiple instructors per course. If you want multiple assignments with the same survey created per course, where each survey relates to a different instructor name via a Custom text data field, use this setting.
Step: Courses
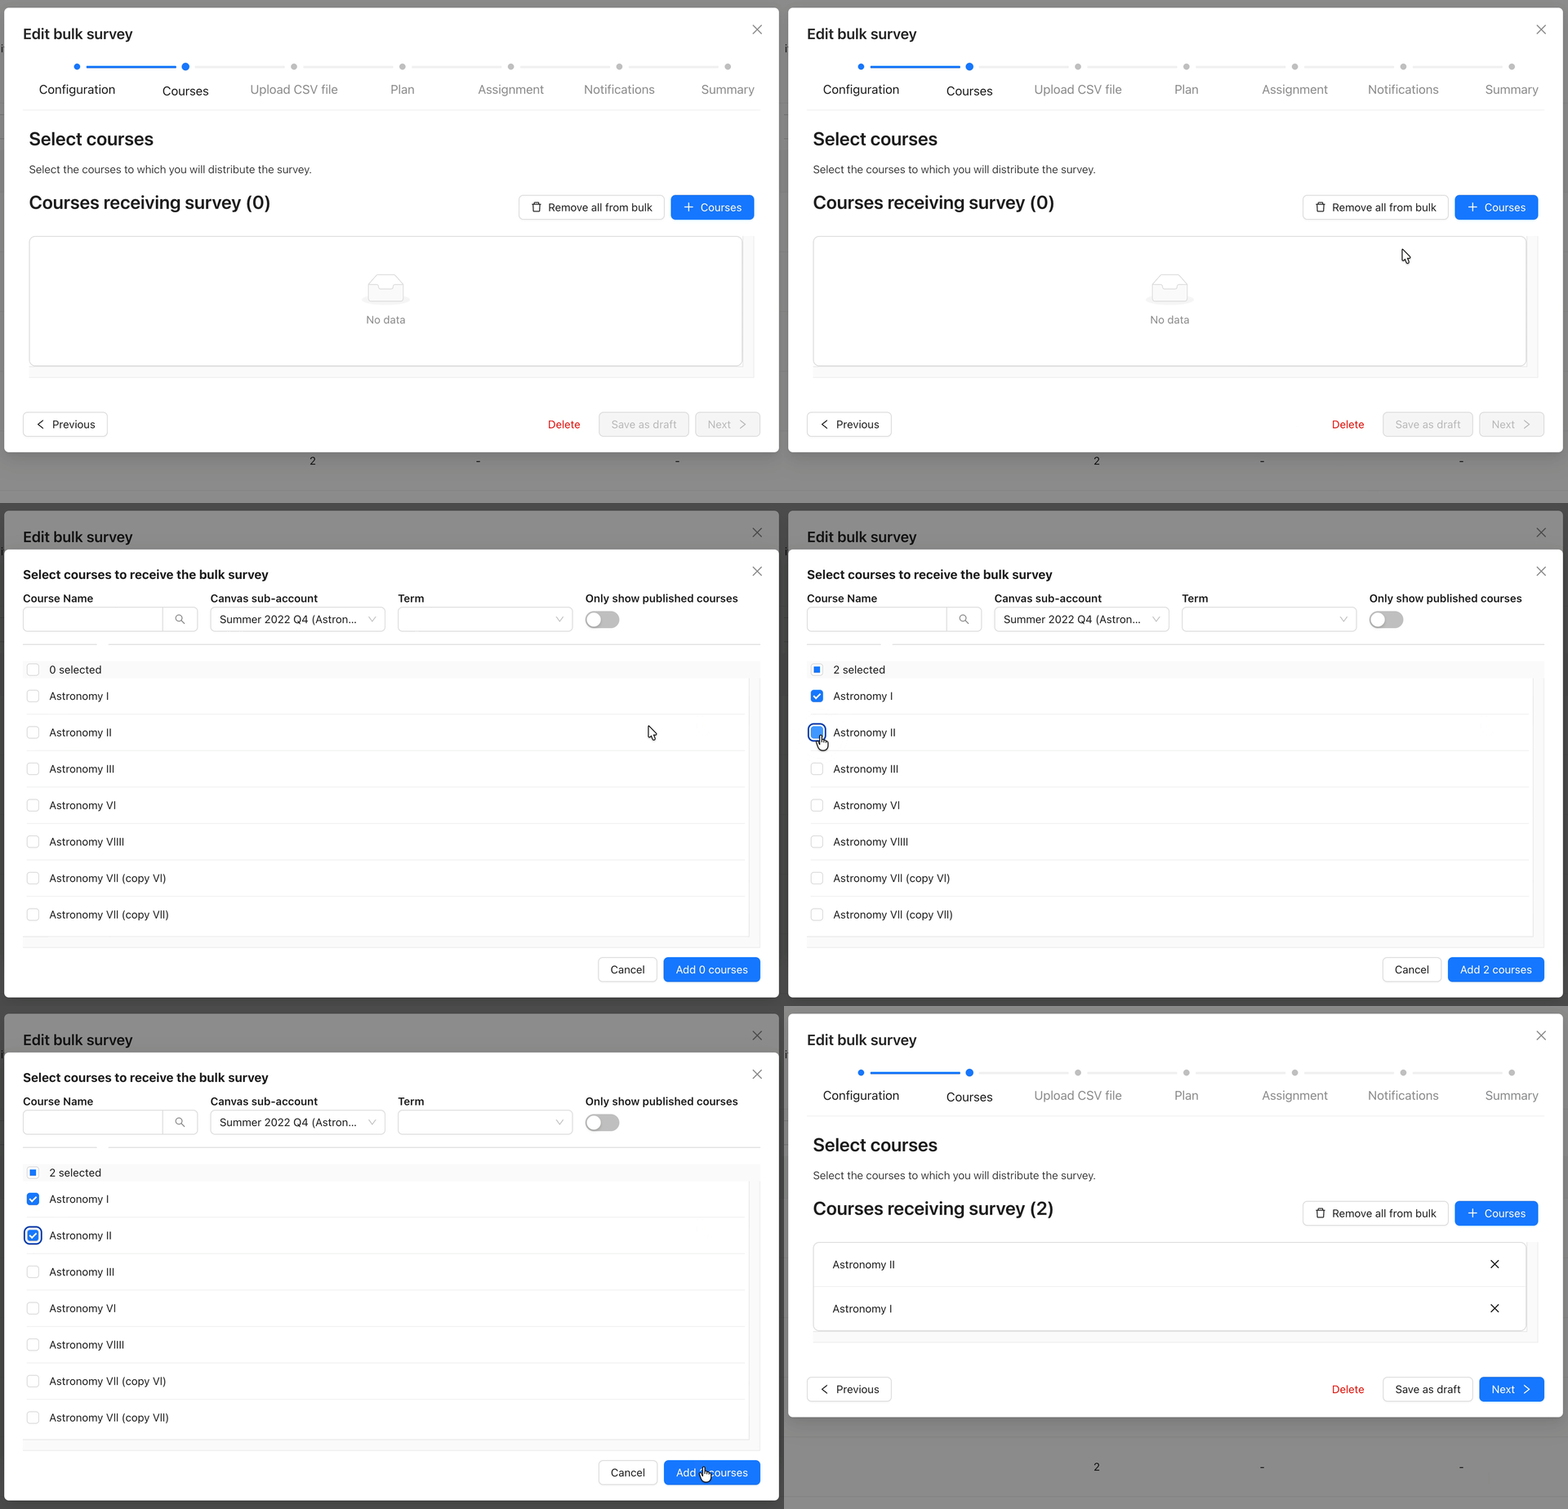
The Courses step allows you to select the Canvas courses that you would like to distribute your survey to (i.e. where the eventual assignments are created).
On the Upload CSV file step, we will include the IDs of the courses you selected in the Template file. We will also warn you if your CSV file contains Course IDs that do not match your manually selected courses.
Step: Upload CSV file
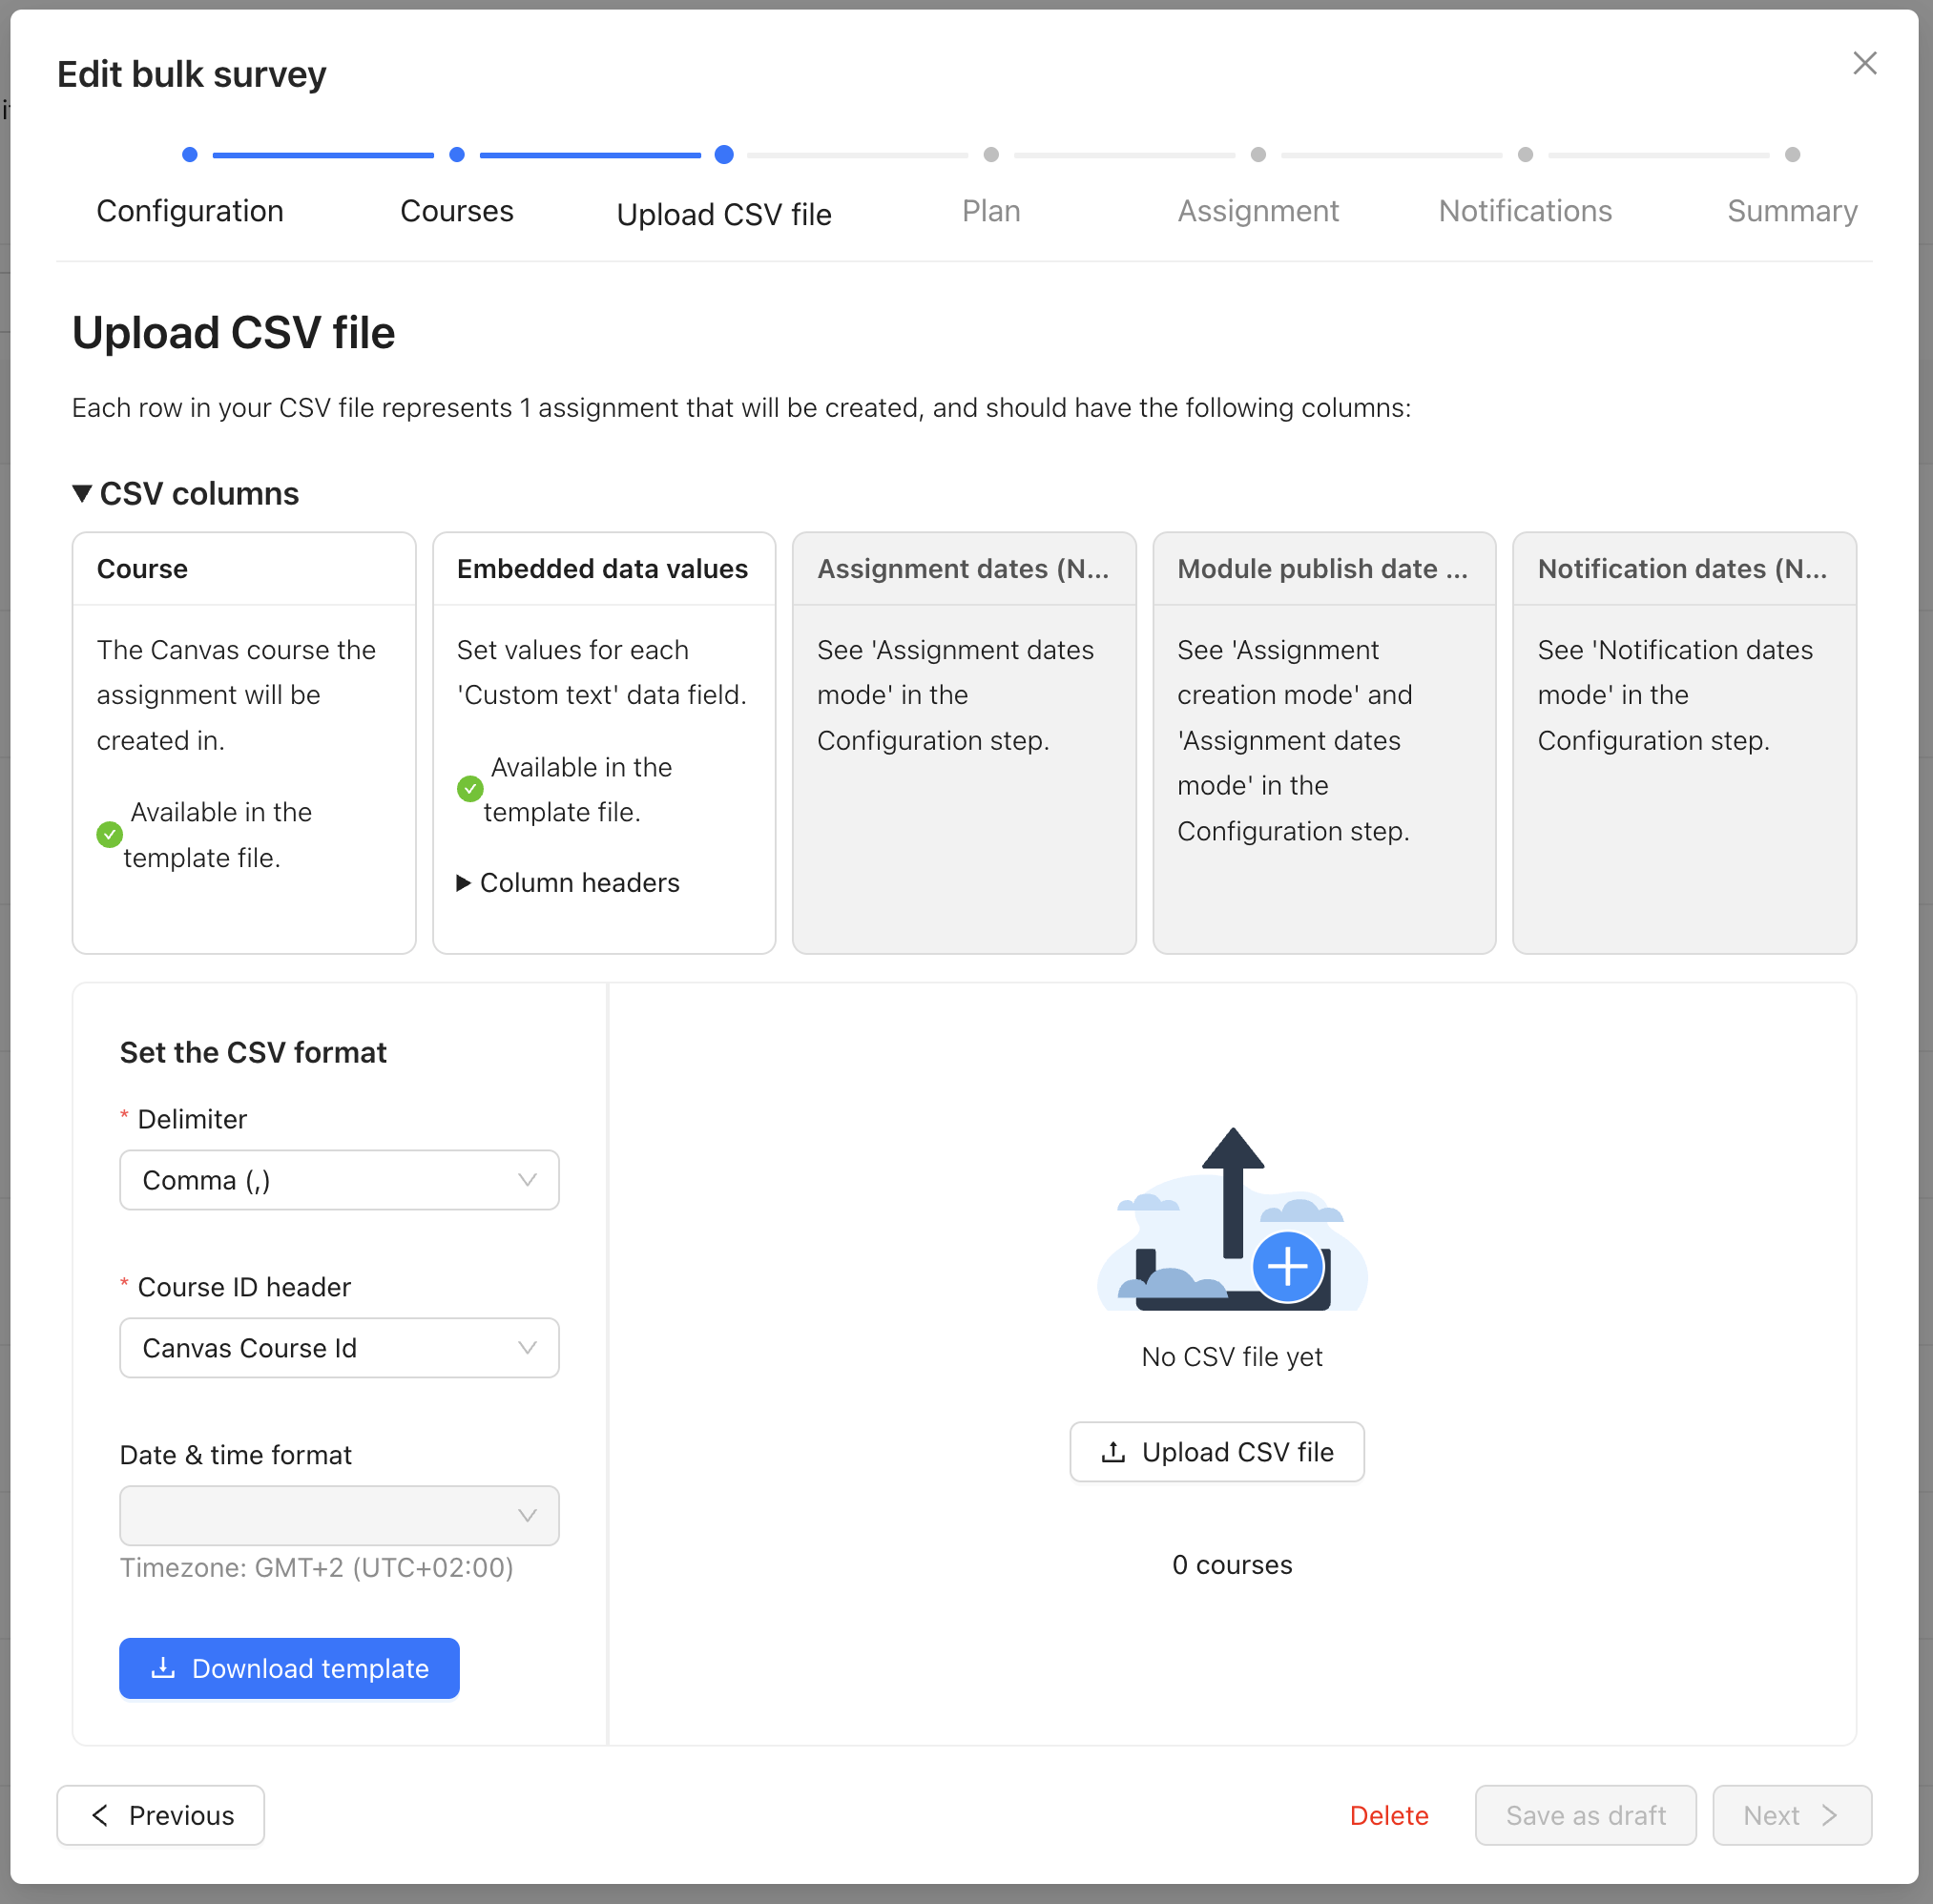

The Upload CSV file step is active whenever any of the following are true:
Your chosen Survey configuration has 'Custom text' embedded data fields activated on it.
You have chosen Course selection mode: CSV Upload.
You have chosen any Individual setting for either Assignment dates mode or Notification dates mode.
Using a CSV file to drive your bulk surveys allows you to comfortably distribute your chosen survey into hundreds of courses at once and, depending on which settings you chose on the Configuration step, allows you to give each assignment a different set of embedded data field values, assignment dates, and notification dates.
Tip: It is typical to have your IT team create this CSV file for you, for example by exporting from your SIS. Use the Template file and the CSV columns section to let them know which headers you require, and the Set the CSV format section to let them know which format you would like things in. This is especially useful if using either Individual Assignment dates mode or Notification dates mode, as it prevents you from having to type in each date & time manually.
Tip: The Upload CSV file step is very powerful for complex use cases. If you only wish to distribute a simple survey (with no 'Custom text' fields) into a handful of courses, consider using Course selection mode: Manual instead.
CSV columns
This section contains cards for each of the headers we are expecting your CSV file to have. It also notes which of these will be provided for you in the Template file.
Note: Only the Course header is always required to have a value in each row. All other headers may have missing values in some or all rows. If this would negatively affect your bulk distribution, we will warn you.
Set the CSV format
Use this section to tell the bulk wizard how your CSV file is formatted.
Delimiter
Whether your CSV file separate columns with commas (,) or semicolons (;).
Course ID header
If you chose Course selection mode: CSV Upload, then you must specify whether you are going to use Canvas Course IDs or Canvas SIS IDs to select the course.
Canvas Course ID: The numeric ID you will see in course URLs, e.g. the
123inhttps://myuniversity.instructure.com/courses/123).Canvas SIS ID: The alphanumeric ID your course administrator set in the course settings. This typically matches the ID that is in your SIS.
Note: Qualtrics LTI has no way of knowing whether your IDs are valid SIS IDs or not, due to their variable nature. Make sure you are certain of which ID you are providing in the CSV file.
Date & time format
Which date format your CSV file uses for the Individual dates columns.
Upload CSV file
After uploading your CSV file, this area will display any errors (red) or information messages (blue) according to the content of your CSV file.
Step: Module
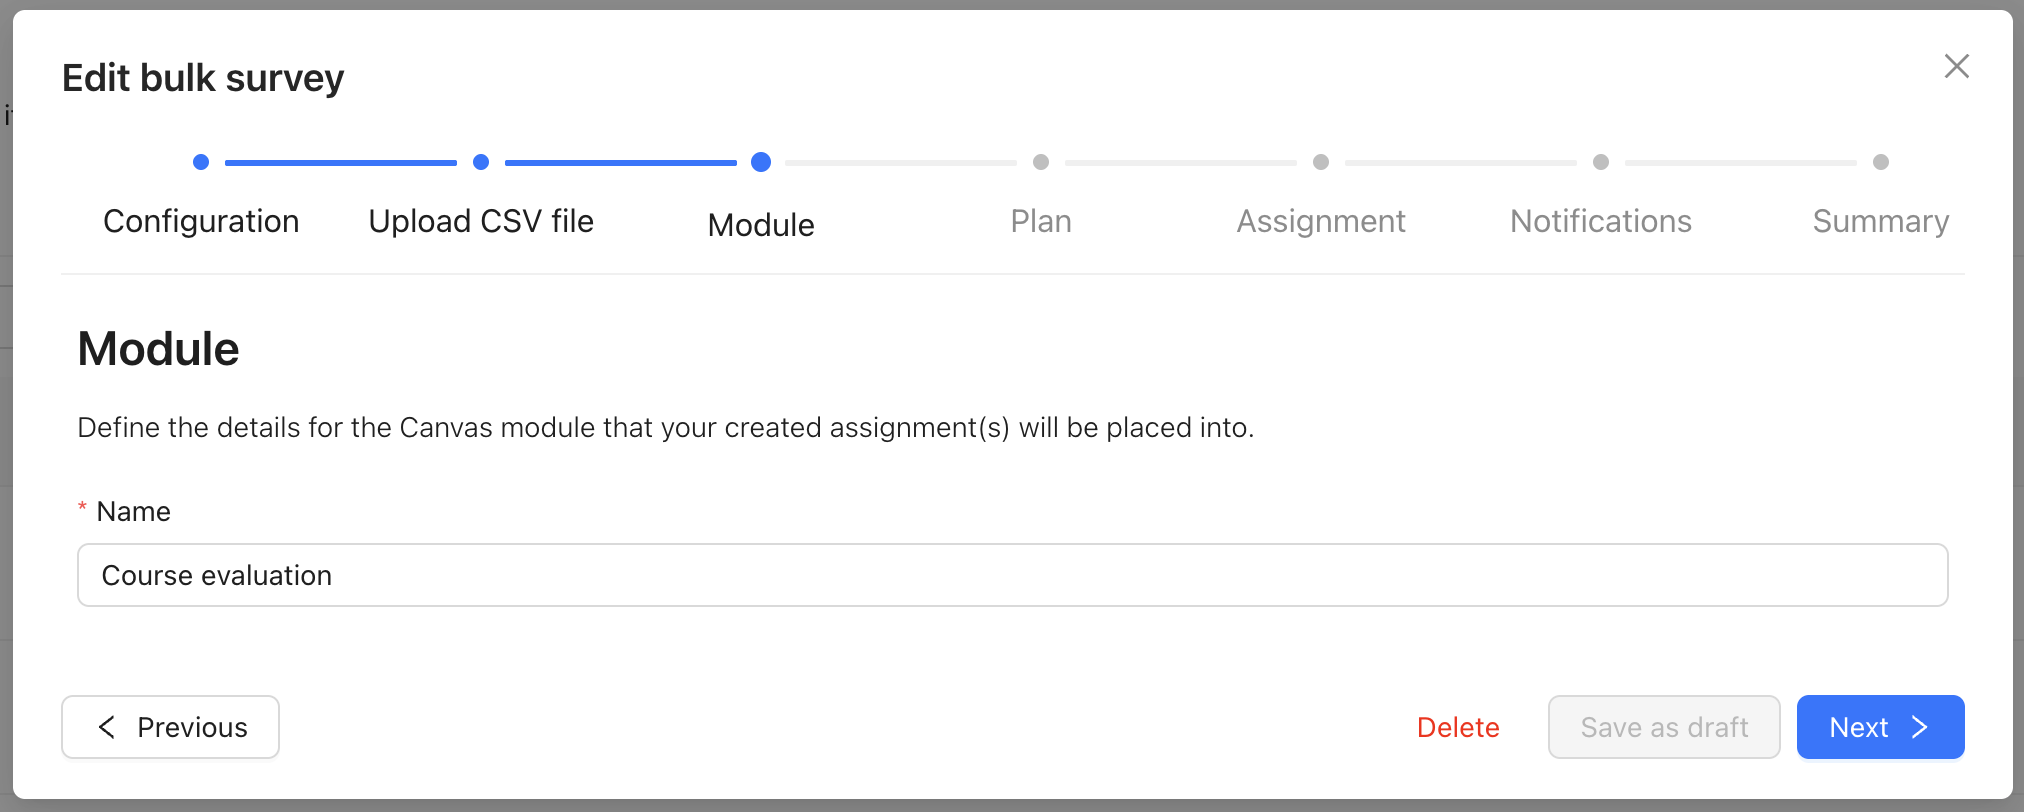
The Module step only appears if Assignment creation mode: Modules was selected on the Configuration step.
On the Module step, you will customize the details of the Canvas module(s) that the eventual assignments are placed into.
Note: We would like to expand this step in the future to allow you to customize your modules more. Interested? Please let us know at support@drieam.com!
Step: Plan
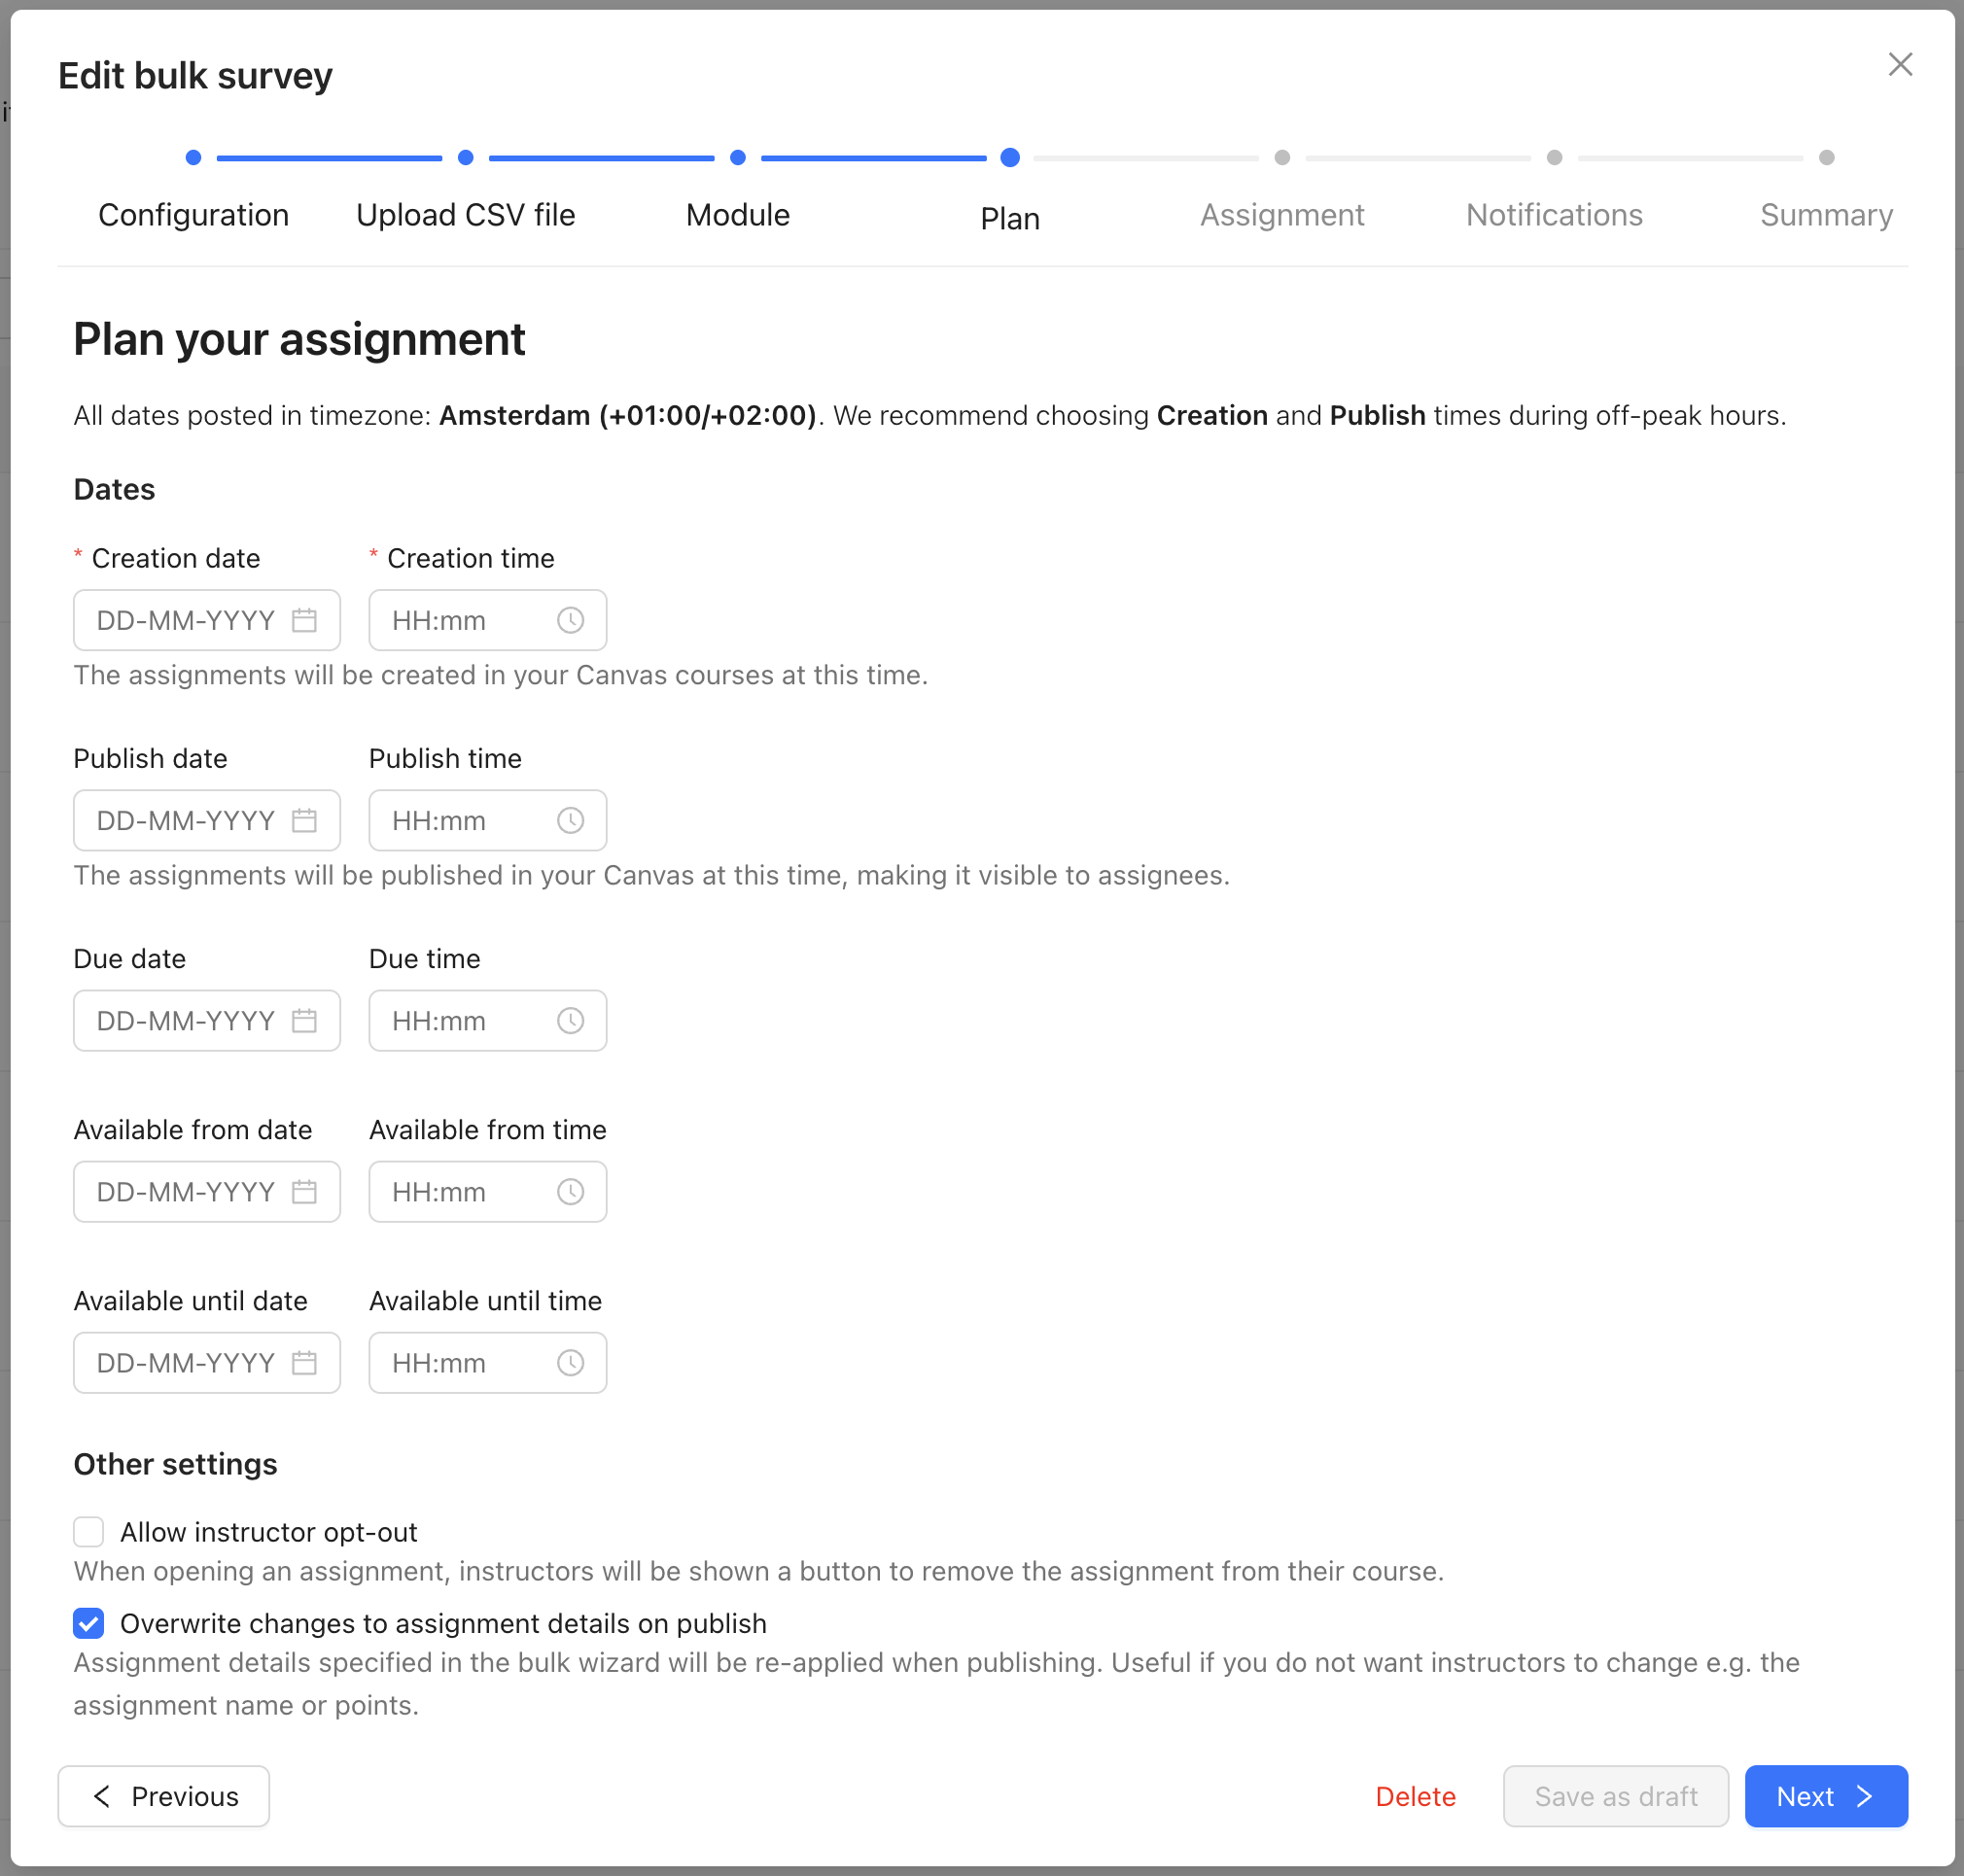
On the Plan step, you will decide when the assignments will be created, published, and their due / availability dates. Other settings are available, explained below.
Dates
All of the dates in this section correspond to dates found in Canvas's own Create assignment interface, with the exception of Creation date, which is the date and time at which the bulk wizard will begin to create all of the assignments according to all of the settings in the wizard.
Other settings
Allow instructor opt-out
Instructors may try to delete the assignments that are created by the bulk wizard. When we publish those assignments, we will re-create any assignments that were deleted in Canvas.
When this setting is enabled, an Opt out of assignment button will appear on the instructor dashboard (which is visible when an instructor opens an assignment). Clicking this button will irreversibly delete the assignment such that it will not be created again. Functionally, this allows instructors to opt out of the assignments you create using the bulk wizard.
Overwrite changes to assignment details on publish
Instructors may try to change the details of assignments that are created by the bulk wizard — for instance, the name or the dates.
When this setting is enabled, when we publish those assignments, we will reinstate the values you chose in the bulk wizard, thus overwriting their changes.
Step: Assignment
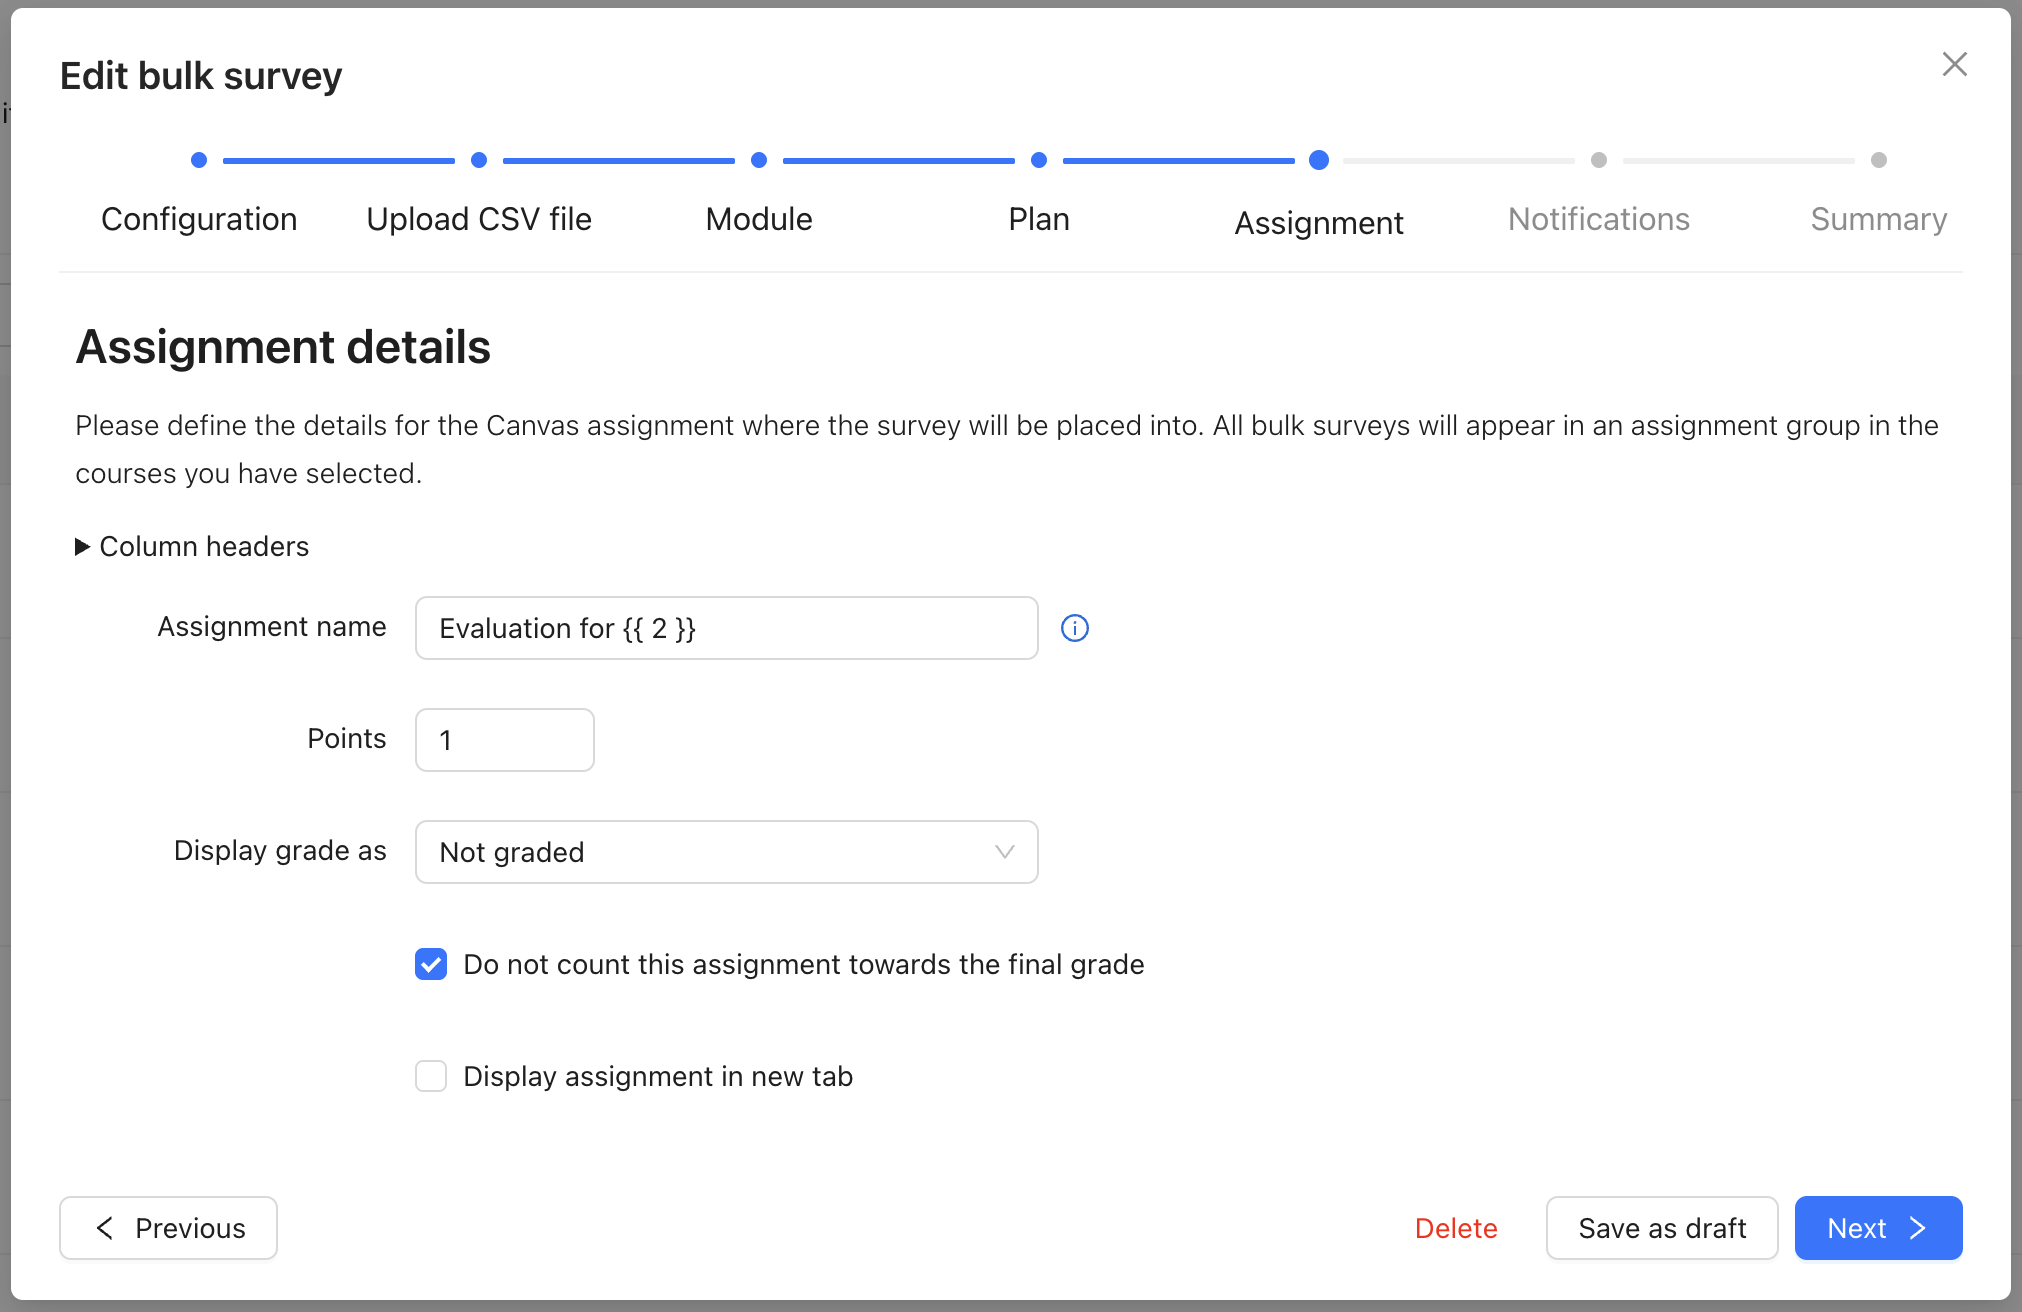
On the Assignment step, you set additional details about the eventual assignments that the wizard will create. Just like the Plan step, this step mirrors the fields found in Canvas's own Create assignment interface.
Dynamic assignment names
The assignment name that you enter will be the same for every assignment that the wizard creates. If you would like assignment names to differ, you can pass in the value of a 'Custom text' embedded data value from your CSV file into the assignment name.
Example
Your CSV file contains the header
72: Instructor name.Your CSV file has two rows, and the value for
72: Instructor nameisJohnfor one course andJanefor the other course.In the Assignment name field, you enter
Evaluation for {{ 72 }}.
When the bulk wizard creates the assignments, one course will have the assignment called "Evaluation for John" and the other "Evaluation for Jane".
Tip: This is useful for the Instructor evaluation use case! You can distribute an instructor evaluation survey for each instructor into a different assignment, each with a unique name.
Step: Notifications
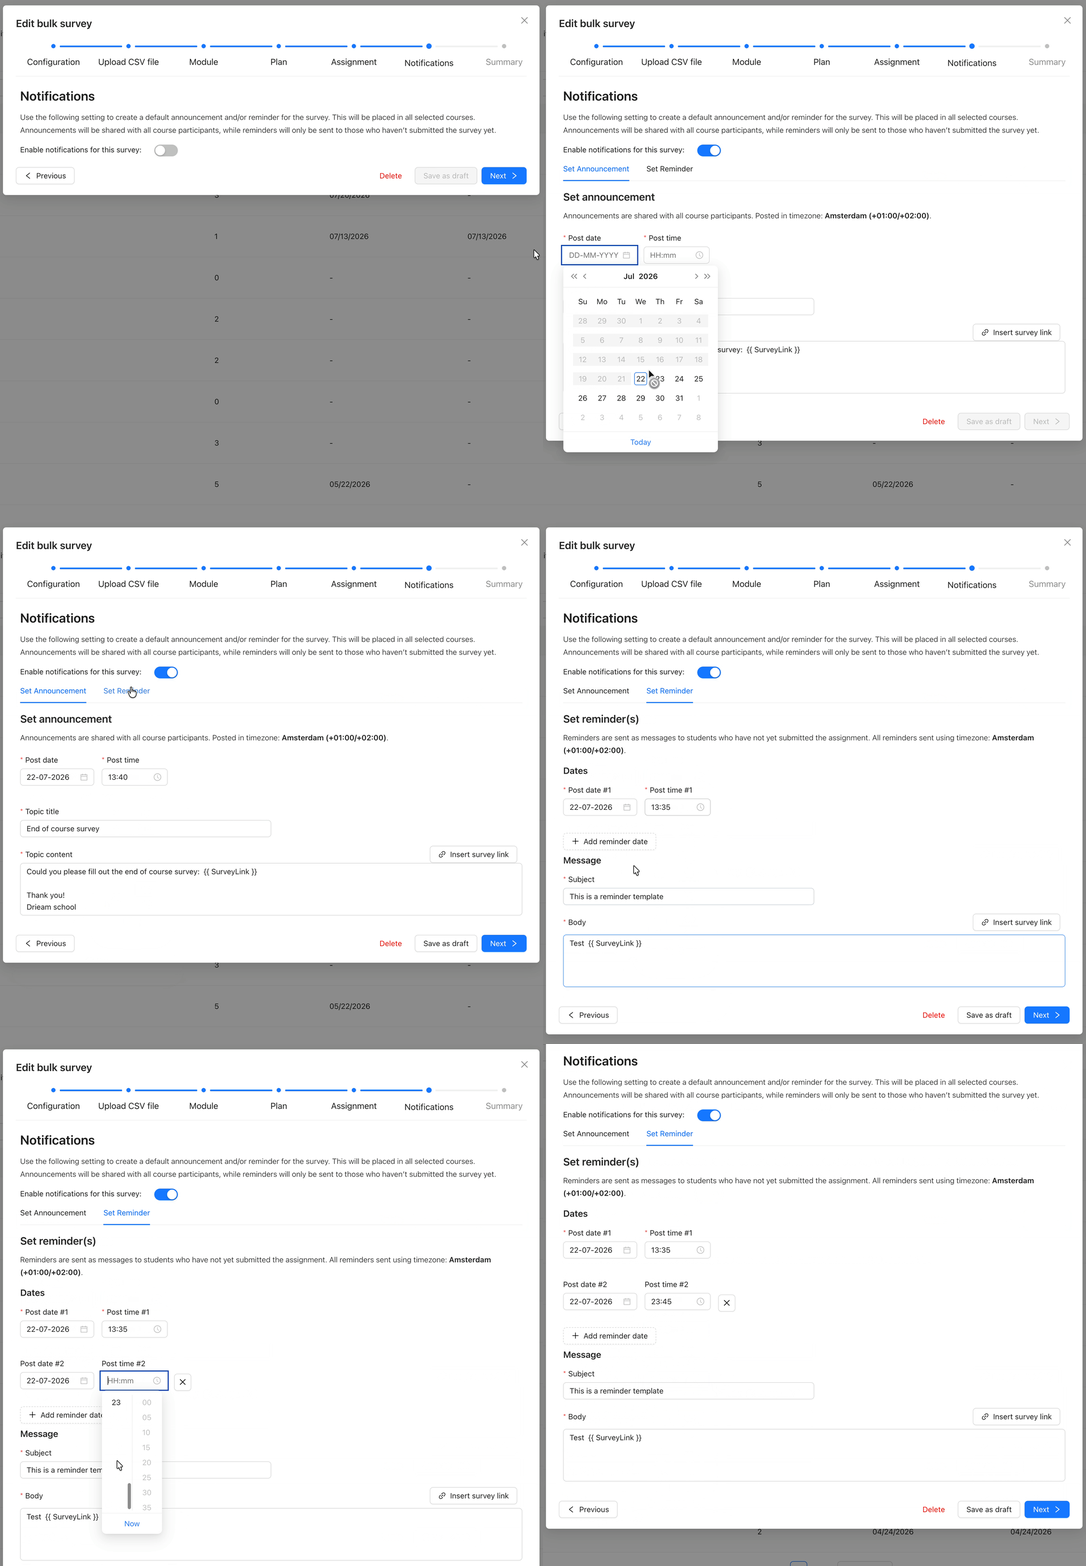
On the Notifications step, you can optionally set up to 1 Announcement and up to 5 Reminders.
Note: For more information, please consult our 📄 Notifications Guide
If you chose the Notification dates mode: Shared setting, then the dates you choose will apply to each assignment that is created.
If you chose any Notification dates mode: Individual setting, then the dates for either the Announcement, Reminder, or both will be derived from each row of your CSV file.
In either case, the specified Subject and Body for both notification types will be the same for all assignments.
For any questions about using Bulk surveys, please reach out to our support team at support@drieam.com!